User:B2kguga/RosAsm
{{gold software}}
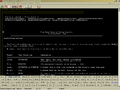
| 150px RosAsm Main Client Area |
|
| Original author(s) | René Tournois (Betov) |
|---|---|
| Developer(s) | RosAsm Community |
| Initial release | September, 1998 |
| Stable release | 2.047c / March 11, 2007 |
| Operating system | Windows, Wine (software), ReactOS |
| Platform | 32 Bits x86 architecture |
| License | GPL free software license and RosAsm license |
| Website | RosAsm site |
RosAsm is a 32bit Win32 x86 assembler developed by a independent group of programmers and contributors. It is the continuation of a assembler called SpAsm, always under the direction of it´s original author René Tournois.
The name stands for ReactOS Assembler, meaning that it was designed to run on that platform as a primary OS, although both projects are developed by an independent group of developers, not related to each other. ReactOS package does not include RosAsm assembler, and uses another assembler (Nasm) to assemble part of their sources.
RosAsm is a assembler with full integration of a IDE, resource editor, debugger and disassembler. The syntax is inspired by NASM's.
and it is released under the GNU General Public License.
RosAsm packages the source code from which an executable was assembled directly within the portable executable files. Because RosAsm produces PE files directly, a separate linking step is not required. This means, though, that it does not allow linking to external object modules other than DLLs, and it does not support the ability to produce object modules that can be linked with other programs.
Nevertheless, the user is allowed to analyse a library file without the needs of linking. One of the features in RosAsm is a library scanner that can analyse the contents of a library file, export the object code, and in the near future convert the library to assembly code to be imported directly to the generated applications without the needs of linking.
RosAsm was always made entirelly in assembly language and it is assembled by itself.
Disclaimer:
To avoid any naming confusions it is important to note that both projects (ReactOS and RosAsm) are made by independent group of developers not related to each other.
ReactOS package does not include RosAsm assembler, and uses another assembler (Nasm) to assemble part of their sources.
Contents[hide] |
[edit] History
In September 1998, René Tournois (also known as Betov), created SpAsm - The Specific assembler which was maintained and supported by him until 24 July 2003. It was then continued with its successor, RosAsm.
René is RosAsm's principal author, although it includes many contributions from others. The very first version of the former Spasm project was built in 16 bits using the free version of a shareware assembler called A86/A386, from Eric Isaacson. With the help of this remarkable program, René continued improving his programming skills until he faced the world of 32 bit programming. In less then Two years, he migrated from A86 to the ASM32 assembler - by Intelligent Firmware Ltd -, whose simplicity, flexibility and very reliable overall performance for system programming, helped him to develop his own, independent and free assembler made entirely in 32 bits. In July 2000, Spasm 1.00 was born.
Since then, René continued his work, for several years, almost alone, releasing several versions of the Software. All versions released were maintained and developed under the GPL rules, in order to give to the assembly community a new and powerful tool, and for mankind in general, a free gift that can be used to improve their lives wherever possible by the continuous development of high technologies making them available to the public. In time he gained contributors that helped to improve his assembler.
Spasm 4.15j ,was the last of the versions released and maintained by René. On 24 July 2003, he decided to take a higher step toward advancing the benefit of Assembly Language and the free programming community. Concerned about the ongoing of the Software and his constant efforts in keeping with his ethical and political views, he left the project. From that remarkable day, RosAsm was born!
RosAsm 1.1a was the first version from the renewed Software, released on 27 July 2003.
All versions of RosAsm are a derivative work of all previous releases of SpAsm, except from it's version 4.15k (and newer) which were being developed and maintained by independent contributors. (Nowadays, the independent version of the former Spasm project seems to be discontinued)
[edit] Functionality
RosAsm is a 32 bit specific assembler with an integrated IDE. As opposed to other Assembly IDE’s, which tend to impress the user by a heavy overload of features and multiple windows, the one of RosAsm is as naked and simple as possible. Most advanced features require reading the Manual, like the very powerful Right-Click, that you will miss it you don't read Source_Editor. For the assembler itself, it has been written with the following goals and characteristics:
- Full assembler-written applications production.
- Stand alone / all-in-one approach / Tends to include all Asm32 needed tools (Debugger, Linker, Disassembler, Resources Editors, IDE).
- Fast output. A 1,000,000 octets application (1Mo is consistent for an Asm written Code), is built in 3.16 seconds on K6/300/win95, from full source analyses to PE writing. No relationship with the usual encodage speed given in other Assemblers documentation. The one of RosAsm is really blazingly fast and counts for few in calculations.
- True pure assembly language without any C-like features. (no STRUC, PROC, USES, LOCALS and so on...). These HLL features are easy to simulate with RosAsm Macros. This exclusion goal is to let users define what HLL abstraction they want. RosAsm itself remains as low level as possible for a Win32 Assembler, but the Macros system is a wide open door to high level writing styles. Examples in Beginners' Tut 5. Added to User macros defined HLLs possibilities, RosAsm may also include selectable Pre_Parsers enabling 'Non-Asssembly' syntaxes, just like external 'Front-Ends' would do..
- 32 bit instructions full set (up to Pentium, FPU, MMX, 3D Now!, XMM SSE/SSE2/SSE3 ).
- Specific programming. - One specific version for each application type. This first version is for ReactOs PE files production. As ReactOs is still under development, you can use it for Win32 applications (Win95/98/NT/2000/XP).
Just a few words to tell what the main author means with "specific". He uses this word in both of two meanings simultaneously:
- Specific as specifically designed for only one file type production;
- Specific as a programming style that does things the simplest way, without any portability or reuse claim. Portability is a wrong headed idea. Reuse of routines should be avoided as much as possible because this is the most assured way we will be calling for a truck to carry a single strawberry.
- "One step" production of applications (from source to application by one click on 'Compile')
Easy of usage:
- No red tape (absolutely) everything as simple as possible (reformed syntax);
- All needed tools are in a stand alone program. No external Linker, Debugger,... needed;
- External File needed for assembling: Win32 Equates;
- Files also outside: Win32 Structures / Win32 Api Functions / Help Files;
- Full control for the programmer on what's going on.
- No internal hidden macros (user macros are easy and powerful).
- Full control of jumps sizes.
- No replacements features in any case (do it yourself).
- Radical suppression of the no-end problem for Labels/Symbolics address/content addressing (reformed syntax, but, as close as possible to NASM's).
- Free open source program written in RosAsm assembly language, of course. This is too a relative guarantee that "it works", at least for the auto-compilation of its own source, more than 3 Megabytes. -not a tiny demo-....
[edit] Features
[edit] Assembler
Each assembler comes with its implied "programming philosophy" and the one of RosAsm is in some way being a "Specific Assembler":
- It is Specific in a way that it outputs at the current moment, only one type of file.
- It is Specific, too, in that the way that it implies something called a "Specific-Programming-Style". This means that the programmer is allowed to choose whatever writing style he wants, using low level assembly or using macros created by his own to simulate HLL styles. This characteristic of the assembler is opposed to Modular-Programming-Style.
Modular programming in Assembly does not make much sense. If one wants to do modular programming, its better to use Basic. It does it perfectly. Now, the fact is that many programmers do not want to always re-invent the wheel, and want to easily reuse something , in some way, I.E. already written chunks of Code.
In the good old DOS time, Static Libraries were very useful to save one from seemingly endless Compilation times. Even today, with some Assemblers such a Code-Reuse Method may be of some interest. Given the actual performances of hardware, and given the Compilation speed of RosAsm, this Compilation times argument falls flat on its face.
In many other Assemblers, you still have LIBs and INCs, and this is, yet today, the HLL way, but, once some code is saved as "reusable" this way, it becomes Black-Box. The bad thing with Black-Boxes is that you will forget what is inside, and, because reusing is easier than verifying what we are really doing, there are many chances that you will run inaccurate solutions to your programming problems.
An important point, with traditional Libraries, is that such an implementation would completely break down two of the most important features of RosAsm , that make the developments fast and easy: 1) Right-Click advanced Searches and the 2) Source Level Run-Time Debugging.
To make a Routine reusable, with these features, you have to make it hold all expected (and unexpected) possibilities. This is to say that you will run big engines to solve tiny problems, in most circumstances.
Facing these problems, RosAsm implemented advanced Code-Reuse features, in order to make it a really up-to-date Development Tool.
The main way chosen for reusing Code is a feature called "Clip". There are "Clips" Files aside RosAsm that the user can edit, in which he can save his precious chunks of code and templates. Inside the Main Editor, there is a Menu option that runs a Clips Dialog allowing to choose / customize / Save in ClipBoard. Then, the user pastes it inside his source. Once done, he can adapt the pasted code to his real requirements. All of this is not much longer than LIBs and INCs techniques, but is far better from an Assembly point of view.
Another method, for the programmers who really want "Libraries", is to consider the use of the TITLE feature as an intermediate solution: We could as well call the TITLE saving, reloading, updating methods a kind of "Source Level Library" method. It is quite simple, to save the Library under the .asm form (Ctrl+S, and/or to save a ready to reuse Application with only the Base and the Library inside). At least, this intermediate solution will enable you with all the so useful features of Right-Click and with a direct pointing in error cases, if nothing else...
RosAsm syntax was made as easy and the most flexible as possible, allowing to the user/programmer to build is applications choosing all sorts of writing styles.
[edit] Form Wizard
The Wizards Concept
A Wizard is a Visual Designer Interface that creates a Source Template to be pasted into a client Source.
RosAsm Wizards are independent PE files, to be located in the [RosAsmFiles] Folder, aside the Equates Files, the Interactive Visual Tutorials, and friends. For now, only one Wizard is available, and is still under development, the Form Wizard.
You can run the Wizards either by the [Wizard] Menu Item, for fresh new creations, or you can re-edit an existing Wizard Template, by Right-Clicking upon the associated 'Tag' Comment in the source code.
The Wizards Templates
When leaving the Wizard, the edited Template is pasted inside your Source, at the actual position of the Cursor.
You should never remove, or even modify, these Comments and the in-between Sources, if you wish to keep the re-edition possibility. Modifying something inside the Template Source will be erased by a re-edition.
Because of this difficulty, you should always paste your Wizards Templates at the end of your Source, in a dedicated TITLE, in order to make sure that you will never accidentally modify them. The Source Editor has actually no security implemented to save you from such accidents.
The actual Form Wizards
This first Wizard is still under development and is actually used to study, define and finalize the exchange mechanisms between the Source Editor and the Wizards. It is fully effective, but will probably be improved and extended.
The purpose of this Form Wizard is to visually edit the windows interface of a Program, a bit similar to what the Resources Editor does, but in a more powerful and flexible manner as, in this case, the creations are not based on Dialogs, but on the 'CreateWindow' Function.
The Form Wizards Files
The Window Wizard File (*.wwf) format is used to store all information about a form. See the Wizard source code for additional information on the file format (TITLE Help of the main RosAsm source code).
Wizard Global Introduction
Drawing
All drawing actions can be done with the mouse.
- Once you have drawn a control, you can move it by a simple drag-and-drop.
- A right-click on one of the controls will display a context menu which provides quick access to Edit menu options.
Properties The properties window allows you to modify all the styles available for a given control.(Window Tab for window styles, WindowEx Tab for extended window styles and Control Tab for control specific styles)
The A-Z Tab contains additional information:
- The Name of the control as it will appear in RosAsm Source
- The Caption of the control
- The client coordinates of the control.
Code writing
You can output the code corresponding to your form in several ways. (All these options are available in the Output menu)
- Display it in a pop-up window.
- Write it to a file.
- Paste it into RosAsm.
Menu Itens control
File New : Create a new form Open : Open a new *.wwf file Save : Save the current form Save As : Save the current form with new name Edit Bring To Front : Bring the control to the top of the Z-Order. Send To Back : Send the control to the bottom of the Z-Order. Delete : Delete the current selected control(s). Lock Controls : Lock control position.
Output Display
- The whole code: Display in a pop-up window the code corresponding to the current form.
- Current control code: Display in a pop-up window the code corresponding to the current selected control (the one with yellow squares).
- Write in file: Write in a file the code corresponding to the current form.
- Paste in RosAsm and quit : Paste into RosAsm the code corresponding to the current form, save it in a file and close the wizard.
Requirements
The wizard uses a file so as to store all the window and control styles.
The file rwslist.dat is a raw list of all available styles with only basic information. You can get more information about this file in the Wizard source (TITLE Help in the main rosAsm source code).
[edit] Debugger
RosAsm comes with an integrated debugger which is built on top of the Win32 Debug API. When you Run / F5 your application (the debuggee) from inside RosAsm, it is automatically debugged. If you try to run a DLL, the debugger asks for a host process, which is expected to load the library.
The debugger will point out eventual exceptions in your source with the faulty instruction highlighted and a detailed exception description.
Furthermore you can set breakpoints in your source either at design time or at run time. When the debuggee encounters such a breakpoint, the OS transfers control to the debugger and halts all threads of the debuggee. With the debug dialog you can view the current flag states, register & data label values and view the contents of the whole address space of your application. The flags are embedded in the toolbar and can be shown and hidden through its context menu (right-click on toolbar).
Exceptions
When the exception box pops up, something went wrong in your application. The debug dialog title shows 'EXCEPTION' and the exception dialog title tells about the code module in which the crash occurred. A detailed exception description is given in the text window. Furthermore the instruction that caused the exception and its address are provided. In case of access violations additional information about the address which was tried to access and the access mode is shown below.
In general, the debuggee must be terminated when an exception occurs. Take care that the debug dialog is closed when you press Terminate. Therefore be sure to analyze the cause which may have led to the crash before you exit.
When you make use of structured exception handlers (SEH) the exception is still reported but you have the chance to forward it to the handler by Pass to SEH. If the exception is handled, the debuggee continues, otherwise the exception will be reported again without the possibility to pass it to the handler.
If the exception dialog caption doesn't show the name of your application but some other module like user32.dll, the exception happened outside of your application and (hopefully) a call to a external routine is highlighted. This does not mean, however, that it isn't your fault :) Most of the time missing or wrong parameters are the reason for these crashes. Check the call stack if in doubt which parameters have been passed to the routine(s).
Another possibility is an Exception in the Non-Code Section. The instruction pointer (EIP) was corrupted and triggered an access violation when the CPU tried to execute code at an inaccessible address. Instructions that may corrupt EIP are stray jumps or a ret when a wrong number of arguments have been passed. A look at the call stack might give a hint.
Registers
The register tab gives insight to the contents of the CPU registers. The debugger checks whether MMX, SSE is supported on your machine and shows additional pages in the tab if appropriate. Segment selectors and debug register (+EIP) pages can viewed / hidden in the debug dialog menu settings. The combo-box offers various representations of the register contents, particularly useful to debug MMX/SSE code with a vector representation of mm0-7 / xmm0-7.
The general purpose registers page differs from the other pages in that it contains buttons for each entry: If EBX contains a valid 32-bit virtual address in the process address space, clicking on the EBX-button takes you to the address referenced by EBX in the memory inspector.
The register contents are all shown zeroed until an exception occurred or a breakpoint is reached.
Setting Breakpoints
You can insert Breakpoints into your source, in two ways:
- Write int 3 (or int3) at the desired location. These are static breakpoints, represented by a 0CC Byte really inserted inside your PE Code Section, like any other Instruction. You cannot deactivate static breakpoints once the debuggee is running but you can switch off 'Hold on breakpoints' in the debug dialog menu settings to switch off all breakpoints.
- Insert one or more dynamic breakpoint(s). These are breakpoints that are not represented inside your real Code. Instead, the debugger inserts (and removes) them, on the fly, while your Application is being debugged. You can define such dynamic breakpoints by a simple mouse double-click, on the left margin of the source editor. When you double-click, a float menu offers you options for inserting/removing a breakpoint. If you use a small font, clicking exactly upon the very first left empty space (the margin), may be difficult. So, another option is available, for the same action: F4, that also runs the dynamic breakpoints float menu, and proposes the insertion at the beginning of the caret line. Note: When the debugger is running your application, you can add/delete dynamic breakpoints (whereas you cannot edit your source, at that time).
Flow control / Tracing
When a breakpoint is encountered the next, not yet executed instruction is highlighted. To continue you can use the Continue menu items, the toolbar buttons or the corresponding shortcuts.
- Run / F6 lets the debuggee continue to run without interruption through the debugger.
- Step Into / F7 executes one instruction and then transfers control back to the debugger. Take care when stepping into API calls, some Windows versions (95 family) won't like or even allow it. When stepping through external module code you will see the module name in the debug dialog caption.
- If the next instruction is a 'CALL' you have the possibility to Step Over the call, which allows the debuggee to run until the call has returned. This is also possible for looped instructions 'REPxx …'. F8 is even effective if the menu item is not available, having the same effect as Step Into, sometimes referred as 'auto-step-over'.
- With Return to Caller / Ctrl+F7 you can step out of the current code and return to the caller in the process' code. This is useful if you're lost in deeply nested calls, or outside of the process' code. It won't work if the current code was called by the OS, like 'Main' or any 'WndProc'.
- Terminate Debuggee / Ctrl+F6 lets you kill the debuggee at any time. First it kindly asks the debuggee to exit, if this does not happen within a few seconds the debuggee is terminated the hard way. It's also used to close the debuggee after an exception has occurred.
Source editor integration
RosAsm debugger operates on the source level. What does that mean in the context of assembly language? It means that you have full access to all symbols (code & data labels, equates) and the tracing takes place in the source editor. When stepping, the instruction which is executed next is highlighted. In case of instructions which have been generated by macros or pre-parsers the statement is highlighted from which the instruction was generated. To keep track of the progress inside the statement, the disassembled instruction is shown in the caption of the debug dialog.
If single-stepping multiple instruction statements is not wished, you can switch to 'Source level stepping' in the debug dialog menu settings. In this mode the debuggee is continued until the next source statement is reached. One of the benefits of operating on the source level, is the possibility of mouse sensitive data observation. When you move the mouse over an addressing expression (e.g. D$eax+8) in the source editor while debugging, you'll see the resolved virtual address (e.g. 010008 if eax=010000) and (if it is a valid address), the 32-bit value at this address in various data representations (hex, unsigned & signed decimal). Observable expressions start with D$, W$, B$, F$, R$, T$ and may contain registers, numbers, plain data labels & equates, segment selectors and '+', '-', '*' as operators. Q$, X$ and U$ are not yet supported. The size specifier determines the quantity and quality of the displayed memory contents. For example, D$ and F$ both reference 32-bit values but the latter is represented as floating point. Expressions which contain local labels or equates can only be observed if those belong to the procedure currently being executed. In other words, when you step through 'Foobar' you can observe the labels and equates local to Foobar in the form 'D$@Local' or the more common 'D@Local'. Examples for legal observable statements: B$eax F$DataLabel+ecx*4+EQUATE W@Local+2 ; only if CurrentLabel@Local is defined D$fs:8 To view the locals of the caller function(s) you can use the call stack described later in this document.
Data viewer
The data viewer shows all data symbols and their virtual addresses declared in your source. When selecting a symbol you can see the content with different representations in the window below the label list. The representations comprise Dword, Word, Byte sizes in Hexadecimal and Decimal (signed and unsigned) notation, floating point in single and double precision, and, if the data stream consists only of printable chars, the ASCII representation.
When right-clicking on a data symbol you can choose to view the content in the memory inspector, or, if the Dword content of the data is a valid address in the process' address space you can view the referenced memory. You can also search the declaration in the source, change the sort order of the symbols (by name, by address) or set watchpoints.
Watchpoints
Watchpoints can be assigned to data symbols. They are useful to observe write and/or read accesses to data, therefore they are sometimes referred as data breakpoints. To set a watchpoint, right click the symbol you want to observe in the data viewer and select 'Break On Write Access' or 'Break On Read/Write Access'.
Watched data symbols are highlighted red (write) or orange (read/write). In the current implementation you cannot set multiple Watchpoints at the same time. Therefore, if you assign another watchpoint to a different symbol you will lose the old watchpoint.
When a watched access is observed the debuggee is halted, the title shows 'WP ...', the data viewer is activated and the watched data symbol is selected. Some implementation specific details:
- Watchpoints utilize hardware debug register that are not handled correctly under old Windows version. Do not use watchpoints on Windows 95/98!
- Access means, that at least one of the first 4 bytes (starting at the data address) is written to or read from.
- Watchpoints only work on Dword aligned data.
Memory inspector
With the memory inspector you can view the memory contents of the allocated memory of your process. The memory is displayed in 4kB chunks which corresponds to the typical page size on x86 systems. The edit box shows the virtual address of the page in hex notation. Each list item contains an offset (e.g. +3F8) and the memory contents at this address. To view content at a specific address just enter it in the edit box and press return or use the virtual page table to select another region. You can also use segment overrides: e.g. FS:8 displays the TEB and goes to offset 8.
- The memory is shown aligned on 8 byte boundaries.
Call stack
The call stack shows the called procedures (labels) along with their parameters and local data. As the name implies it is derived from the stack content. When right-clicking on a function name you can show the invocation or declaration. The call stack is built using advanced interpretation mechanisms and should also show function calls inside modules, functions which don't setup stack-frames, ... However, it is only an interpretation. If your code or the modules you use make dynamic stack allocations (sub esp eax) or use jump tables the success rate will drop significantly. (It also does not handle spaghetti code very well) .
Best results are achieved if you follow these rules:
- Always use ret to return to the caller and to remove parameters from the stack
- Only use jumps to navigate inside your functions and not across your whole source
- Adhere to the standard code sequence to enter functions with local data (push ebp | mov ebp esp | sub esp x)
Function calls which belong to different modules (referenced code is outside your source) are grayed for clarity. If the information given is yet too detailed you can filter the output by right-clicking on any function name and selecting 'Hide module calls' or 'Hide intra-module calls'.
Debug log
The traditional way to debug code when no debugger is available is to log information to the console or a file. This might even make sense if using a debugger: For example, when the applications working is time-dependent and halting the program for inspection is not feasible because it would tamper with the output. Win32 offers a function for applications to pass strings to a possibly attached debugger: 'OutputDebugString'. When the debuggee calls 'OutputDebugString' the debugger is invoked and adds the string to the log tab and a log file is created aside the application with the name '[AppName]_dbg.log'. call 'Kernel32.OutputDebugString' {'Hello big brother' 0} For convenience the log tab also lists mapped & unmapped modules and the creation and destruction of threads. Note that 'OutputDebugString' causes a context-switch to the debugger and thus is an expensive operation.
Address space
The address space tree shows all user accessible virtual memory pages of the debuggee. These are comprised of the mapped PE, the process environment block (PEB), the thread environment blocks (TEB), the stacks, the imported modules, the modules loaded by LoadLibrary, memory allocated by VirtualAlloc and the environment.
The root nodes can be regarded as the 'logical groups' in which the memory was reserved while the leaf nodes represent the actual 4kB pages represented through the virtual start address and page properties (eXecute, Read, Write, Copy on write, Guard, No cache). When you double-click on a leaf node the page is loaded in the memory inspector.
[edit] Library Scanner

RosAsm comes with a library scanner which is built to the user or programmer analyse or study COFF library or object files.
The library scanner creates a structured form ready to be assembled.
The main purpose of the library scanner is to provide to the programmer an alternative way to analyse or insert his object files inside his project.
As opposed to linkers, the library scanner was designed to recreate the source code from a given library file to the user insert on his application only the function or data he wants with the hability to rewritting his work if needed.
What the library scanner currently does:
- Enables the user to copy the contents of a COFF library or object file onto his own project, thorough the tab "Library Structure"
- Displays a listing of the contents of a library or object file such as: Index, File name, extension, size, object type, check for exported functions eventually existent, displays the machine type, setions, symbols of each object
What the library scanner will do:
- Display a disassembly listing of the selected object file or all loaded object files inside the library
- Create a digital DNA of each library to be used together with the disassembler, making easier to the decompilation process check which type of data it was created.
- Enables the scanning of non COFF library files formats, sich as OMF, or delphi file formats, to enable the ability to help the decompilation process to work in all sort of PE files, independently of which compiler it was originally made.
Purpose and scope
The Library Scanner will remain under intensive developments for several months. In its final state, it will be a feature used in the main Decompilation output process for a complete restoration of the Targeted File, ready for re-compilation in a significant amount of cases.
[edit] Disassembler
When you open a PE file without a Source Code inside or not written with RosAsm, RosAsm offers to Disassemble it. The proposed options are:
- Normal Disassembly. This is the default, for the Source building, that is a simple Assembly Source. All Data and Code Labels are in the form of, for example, 'Code0403058', 'Data0405062'.
- With Commented Hexa Code. In this Mode, the Hexa Code is given, in Comments, at the right of each Instruction.
- With Symbolic Analyses. In this Mode, RosAsm tries to point out the Parameters passed on the Stack, for each Api call. When found, it replaces the mechanic labels by their true Names, as found in the Win32 Documentation. This is a first step toward full HLL interpretations.
General approach RosAsm's Disassembler is first, an Automatic Disassembler, that tries to provide a Source that could be re-compiled without any further hand work. This is actually effective on most small Demos. Between, say, 100 and 300 Kb, this may also work, but it depends, essentially on the quality (clean vs dirty construct) of the PE. Over this size (Megabytes) there is no hope, and probably never will be, unless the PE organization would be absolutely standard.
What the Disassembler actually does
- Intelligent Recognition of the PE's Sections, even in cases of merged Sections.
- Recovering of all Resources (but Version Info Resources, not yet implemented in RosAsm). The Resources saved by Named IDs -instead of Numbered IDs are computed, but the RosAsm Resources Editors are not able, actually, to assume them (all RosAsm Resources Editors work only with Resources saved by Numbers). For the Main Menu, the original IDs are replaced by the usual RosAsm Equates Names, if the 'MainWindowProc' branchings are identified.
- The various Data Formats recognitions, for Floats, Strings, pointers to Code or Data, are implemented.
- Most small Applications, like Iczelion Tutorials Demos (all) and Test Department ones (all but Tut_5), Four-F Cocomac Demos, and so on... are correctly disassembled and re-assembled (re-run) in two Clicks. Even middle Size Applications, like the Iczelion Demo 35, for a RichEdit Editor, or Test Department's biggest Demos, seem to run fine, or, at least..., partially..., without any intermediate hand work between the Disassembling and the [Run].
- A first HLL Interpretation, based on the Api calls Parameters may be applied. In this case, all the identified Api call parameters are replaced by the names found in the Api List Documentation. This process, actually based on the final Source text manipulations, is... very slow.
- MainWindowProc and Main are detected and provided in the Source.
- Api calls performed through a Jump Table (two Instructions instead of one) are replaced by the usual RosAsm direct calls. The original Api Jumps Table is provided, for cases of moves to Variables. In such cases, the Jumps Table Label is used.
A bit of Interactivity has been introduced since RosAsm V.2.022a.
What it does not do
- It will fail on encrypted PEs, on Auto-writeable Code, and on Code making a direct usage of hard Coded References, instead of Pointers.
- It does not yet take care of the Menus-Items Equates for Dialogs. Only the first Menu, considered to be the default MainWindow-Menu is assumed.
- Another weak point, is with the Recognition of small Chunks of Data nested inside Code. The Intelligent recognition may fail at deciphering if the Chunk is Data or not-called-Code. In such cases, it provides the DB Bytes, plus several commented Interpretations. (In other cases, when the Chunk is big enough to be identified true Data, the Chunk is moved into the normal Data).
- The replacements of Structures Members Names and of Win32 Equates Names is not yet implemented.
- The HLL Constructs (If, While, and friends) replacements are not yet implemented.
Practice In practice, if you believe that you will have the possibility of disassembling a big Executable, and of re-Assembling it in two clicks, you will be disappointed. This is not at all the purpose of the Disassembler, and no Disassembler on earth will ever do that. It is simply impossible, unless the complete file would be 100% standard, from a Sections point of view and 100% clean, which is extremely uncommon.
So, work first with small Applications.
With middle size (100 / 300 Ko), you may have a valid Disassembly, that would not reflect exactly the Disassembled PE, because of minor failures.
The most usual failure cases are with erroneous interpretations of small Chunks of Data or Code. In these cases, you may give a try to the "Bad Disassembly" Option of the Float-Menu, when double-clicking on the suspected Label.
Then, once the Application is correctly re-compiled, it may also misbehave because of several minor points, that you may have to fix by hand, after analysis.
Purpose and scope
The Disassembler will remain under intensive development for several months. In its final state, it will be a universal Decompiler outputting a complete restoration of the Targeted File, ready for re-compilation in a significant amount of cases.
Even in case of failure of the full "Two-Clicks-Disassembler-ReAssembler" process, the results will often be usable, at least, for study and for helping at the translation works.
The Disassembler is a Study and Translation Tool designed for the Open Source Movement. The main goal is to make the translations of Demos and Tuts to RosAsm syntax, as easy and fast as possible. Even when having the Sources, a port to Assembly may be not so easy, with big files. We can be sure that the Disassembler will, at least, make fewer translation errors, and will take much less of our working time than we would when translating it by hand.
[edit] More features
- Complete set of windows api equates (63763 equates)
- Set of 1677 windows api structures
- Icon Editor
- Resources Editor (Dialogs, menus, strings, images, icons, RC Data)
- Guid listing
- Tree view listing of data, labels, functinos used on the soruce code
- Powerful macro system
- Assembly tutorials and demos
- Dll, Imports and Exports Scanner
- Api Listing
- Encoding Tool to analyse small chuncks of code
- Code completion
- Separation of huge sources by titles
- Structure Viewer
- Compilation Statistics
- Complete executable Help file (named as B_U_Asm)
- User defined IDE styles.
- Configurable Toolbar
Note: The colors of the images displayed here were made by one of the developers. They are not the default from RosAsm.
-

RosAsm user defined macro set
-
RosAsm monolitic source separated by Titles
-

RosAsm structure viewer
-

RosAsm Guid Viewer
-

RosAsm icon Editor
-

RosAsm Api listing
-

RosAsm Configuration Dialog
-
RosAsm Dll Scanner
-

RosAsm Dialog Editor
-

RosAsm Encoding Tool
-

RosAsm Treeview listing labels, functions, data declarations
-

RosAsm compilation statistics


[edit] Game creation
There are few games created with RosAsm. A remarkable programmer called GGes built some interesting and entertaining open source games with RosAsm.
Another programmer called Martin created a remarkable NES emulator called Nessie (emulator) in a short period of time using RosAsm.
-

Packman game made with RosAsm
-

Snake game made with RosAsm
-

Spacegame made with RosAsm
-

Nessie NES emulator made with RosAsm


| Look up assembly language in Wiktionary, the free dictionary. |
Assembly is a language suitable for creating all sort of applications, and in what concern game development this assertive couldn´t be more true.
[edit] Ongoing projects and future
As an opensource program, RosAsm is in constant evolution. The developers works hard to bring to the assembly community a full integrated programming environment, where the creation of programs can be made as easy and fast as possible.
RosAsm developers are working hard on the current projects:
- In the coming months developments will focus upon the Disassembler, and this will go on, until then Disassembles may be recompiled without (or with very little) hand work, this is to say that it will no more be a Disassembler, but, better said a Decompiler. The perfect state, in which we could guarantee disassembling, interpreting, re-compiling, without any hand work at all, will never be completely achieved, because the interpretation of all the data and what that Data means, inside a PE is not always 100% possible. Most interpretations are based upon probabilities. Nothing more. But, applied on simple Files, or upon Files produced by the user himself, in another language, the outputted results should be worthy of the actual effort, as this implementation will turn RosAsm disassembler onto a full universal decompiler software.
- Pre-Parsers will possibly be added. Actually, the Equal_Parser is implemented. The OOA Pre-Parser development is delayed, but the overall plans of its organization and syntax are now well defined (as far as possible). The developers are thinking of using OOA Plans for a first experiment of structured collective Development, as indicated in the above Introduction. Other Pre-Parsers, for example, HLLs ones, like the Equal one, may be added if some volunteers want to. The developers opened a new TITLE inside RosAsm source, whose name is "NewParser", given as a start point, for volunteers implementations. It includes comments that, should help to start working under good conditions.
- Wizards (components visual designers) will be implemented, the same way the actual Form Wizard is, either at the end of RosAsm development. The Wizards may physically come under the form of a side DLL, or of an independent EXE, grouping all of the various specific Wizards (for ToolBars, for Images Viewers, and so on), probably around the actual Form Wizard.
- The Win32 free documentation project is yet up and running. Its purpose is to have a kind of Data Base for all Win32 Data, immediately available from inside RosAsm, either by a Dialog for viewing Api calls, Equates and Structures, or as directly available informations for the Disassembler HLL interpretations. The huge work for Equates has already been achieved, thanks to Guga.
- A Code-Ripper is to be implemented. Its purpose will be to select (after Double-Click upon a Code Label, and user selection of an added [Code Ripper] Option), all of the downward tree of the Routines called from this Label Procedure, with all concerned Data. Useful from disassemblies or for Code Reuse.
- A Code symbolic Profiler is also to be implemented. Its purpose will be of outputting something a bit like the Tree-View Dialog, but with an added Bar, at each Label, representing the proportional time each Routine will have been consuming in a given Run. Useful for Strategy Optimizations (the only serious one).
- A Code Level Profiler may be implemented, as well. The overall idea is to add an Item in the Floating Menu coming with Right-Click on selected Blocks: If the selected Block contains only simple Instructions, add a Profile Code Option, which activation should return the Ticks number. The implementation should not be that hard, as an example of how to compile independent Instruction is already available in the Tools+Encoding Box feature. Problems: ecx loops must be under Control. Memory accesses must be under control. Api calls cannot be included. Jumps and Calls must be under control. Equates must be emulated. Macros must be refused. This feature is not for timing the running Application, but for timing the simple execution of one or several Opcodes, for users interested with Code Level Optimization.
- Finishing the 2nd stage of the Library Scanner and starting the implementation of the digital DNA system to help the performance of the disassembly outputs.
| Wikibooks has a book on the topic of |
The developers are working to provide this tools as fast as possible, even if the actual staff contains a very limited amount of developers contributing to the whole package every day.
[edit] Authors
Developers:
| Name | Country | Activities | Current Status |
| René Tournois (Betov) | Main Maintainer | Retired | |
| Ludwig Hähne (wkx) | debugger Command Line. debugger Maintainer. | Active | |
| Gustavo Trigueiros (Guga, aka Beyond2000!) | Win32 Doc Project Maintainer (Equates, Api, Structures). General overview of assembler, disassembler, creation of LibScanner, Digital DNA System, among other things. | Active | |
| Julien (Scarmatil) | Equal Pre-Parser. Form Wizard. | Active | |
| Are Jon (Half a Wannabe) | Unused Symbols Box, IncInclude Preparser and demos. | Active | |
| Yeohhs | Examples, tutorials, guides. | Active | |
| Eric Asbel | Board Maintainer, creation of COM examples. | Active | |
| James F. Marinic | Proof-reading of the help file (B_U_ASm) and creation of Visual Tutorials. | Active | |
| Diego Fraga | Rewrite of the Resources building, with Named IDs assumed. | Active | |
| GGes | Game developments, demos and tutorials. | Active | |
| Rémi Coquet | Guid files with assistance of René Tournois. | Active | |
| Joddy Xefer | RosAsm logo. | Active | |
| Nico Nico (Scalp) | Mouse Wheel implementation | Active | |
| Rikkert Vifferin (EvilBro) | Rewrite of the assembler Parsers. | Active
|
|
| Ken Bentley (Kenny) | Keys Table managements in the Source Editor. Former OpHelp.exe Manager | Retired | |
| Peter Tuente (Pit) | StatusBar implementation | Retired | |
| Marcelo Zamateo (Zama) | FPU HLL Pre-Parser | Retired |
[edit] See also
[edit] External links
| Wikimedia Commons has media related to: RosAsm |
- RosAsm Home site of the RosAsm Assembler/IDE
- Main RosAsm Forum RosAsm Forum
Category:Assemblers Category:Programming languages Category:Assembly languages Category:Disassemblers Category:Debugging Category:Articles with example Assembly code
bg:RosAsm ca:RosAsm cs:RosAsm de:RosAsm et:RosAsm es:RosAsm fr:RosAsm it:RosAsm he:RosAsm hu:RosAsm nl:RosAsm ja:RosAsm no:RosAsm pl:RosAsm pt:RosAsm ru:RosAsm sk:RosAsm fi:RosAsm sv:RosAsm uk:RosAsm zh:RosAsm